No products in the cart.
Should You Clean an Oil Painting Yourself? Here’s What You Need to Know
An oil painting can transform a room, becoming the centrepiece of your home decor or a valuable family heirloom. But over time, even the most carefully displayed artwork can lose its lustre, accumulating layers of dust, dirt, or grime. At this point, many people face a critical question: should you attempt to clean an oil painting yourself, or is it safer to leave the job to a professional art restorer?
Cleaning an oil painting is not as straightforward as dusting off your furniture. Oil paintings have delicate layers of pigment and varnish, which, if handled incorrectly, can suffer permanent damage. Therefore, understanding the correct cleaning methods, essential precautions, and when professional help is necessary, is vital to ensure your precious artwork remains in excellent condition for years to come.
This comprehensive guide will provide clear, practical advice, outlining safe DIY cleaning methods, essential precautions, and circumstances where professional expertise is crucial. Whether you’re a seasoned art collector or simply inherited a beloved family painting, this guide will help you navigate the safest ways to preserve your valuable artwork.
To better understand professional approaches to art restoration and to determine when professional care is necessary, explore detailed advice provided by the Institute of Conservation (ICON).
Understanding the Surface of Your Oil Painting
Before cleaning your oil painting, it’s important to carefully examine and understand the painting’s surface. This will help you avoid accidental damage and ensure you select the most suitable cleaning method.
Key things to look out for include:
- Accumulated dust or dirt (appears dull or greyish)
- Discoloured or yellowed varnish
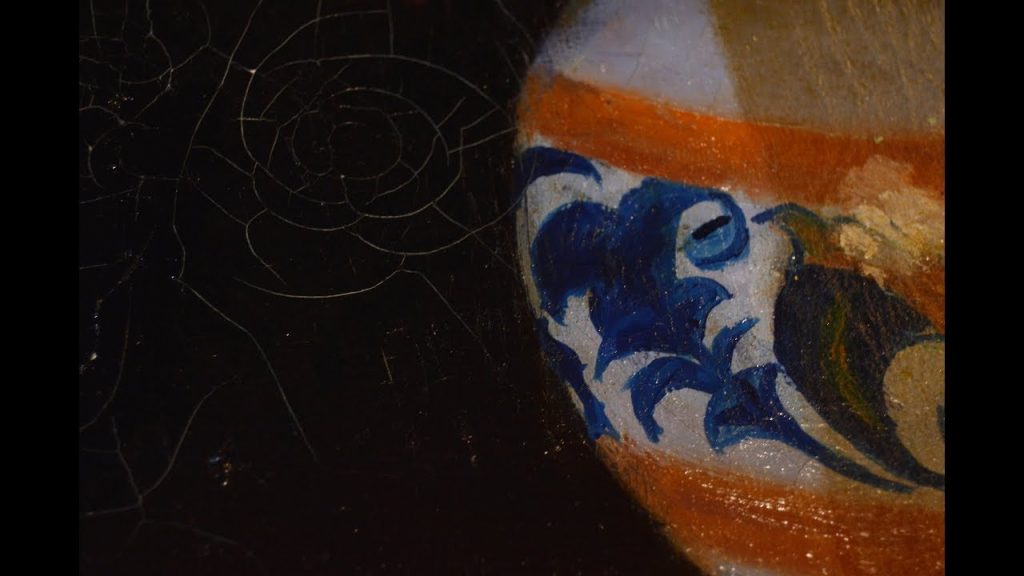
- Fine cracks, known as craquelure
- Areas of flaking or peeling paint
- Signs of previous restoration or repairs
Oil paintings can vary significantly depending on their age, materials, and varnish type. Older paintings—particularly those from the 18th or 19th centuries—are often delicate and highly sensitive to cleaning, whereas modern oil paintings might have sturdier surfaces but could still react unpredictably to cleaning methods.
To safely assess and clean your painting, understanding the differences between old and modern oil paintings is essential. Older paintings typically use natural pigments and traditional varnishes, making them sensitive to harsh chemicals and aggressive cleaning. Modern paintings, however, often include synthetic materials, which may respond differently to certain cleaning agents. Knowing these differences can help you avoid damaging your artwork.
If you have any doubts or notice significant deterioration, consult a professional conservator to avoid irreversible harm.
For detailed guidance on safely assessing the condition of your oil paintings, visit the Victoria and Albert Museum’s conservation guide here: Caring for Your Paintings.
When You Should Avoid DIY Cleaning
Cleaning an oil painting yourself might seem cost-effective and convenient, but it’s important to recognise when DIY methods could cause more harm than good. Certain scenarios call for professional intervention, as the risks of permanent damage outweigh the potential savings or convenience. Here’s when to avoid DIY cleaning and opt for professional art restoration instead:
Visible Damage or Fragility
Attempting to clean fragile or damaged paintings at home can cause irreversible harm.
- Cracking or Flaking Paint – DIY methods risk detaching paint flakes.
- Discolouration or Severe Yellowing – Indicates aged varnish needing specialist attention.
- Warped or Damaged Canvas – Handling without expert techniques can worsen the damage.
Valuable or Historic Oil Paintings
Significant pieces deserve professional attention to protect their financial and sentimental value.
- Antique Artworks – Paintings over 100 years old require specialist care.
- High Monetary or Sentimental Value – DIY cleaning risks devaluing your artwork.
- Historical or Rare Works – Professionals ensure conservation standards are maintained.
Uncertain or Lacking Experience
Acknowledging your skill limitations can save your artwork from potential damage.
- Never Clean if You’re Unsure – Professional restoration guarantees safer outcomes.
- Complex Cleaning Required – Techniques involving solvents or removing varnish are best left to experts.
- First-time Cleaning Attempts – When in doubt, seek expert advice to prevent damage.
To find an experienced professional conservator who can safely restore your valuable artworks, consider consulting the ICON Accredited Conservator-Restorer Directory, where trusted art restoration specialists are listed.
Step-by-Step Guide: Safely Cleaning Your Oil Painting at Home
Cleaning your oil painting at home can be a satisfying experience, restoring vibrancy and enhancing your artwork’s aesthetic appeal. However, it’s essential to approach this carefully and cautiously. Even simple cleaning, if done incorrectly, can cause lasting damage. Follow this extensive, in-depth, step-by-step guide to safely refresh your artwork’s appearance.
What You’ll Need:
Before you begin, ensure you have the right materials to safely clean your painting:
- Soft Cloths:
- Microfibre cloths or lint-free cotton are ideal. Avoid paper towels as they can scratch delicate surfaces.
- Soft Brushes:
- Brushes with natural fibres (like soft sable or goat hair) are preferable.
- Avoid stiff brushes or synthetic fibres that might scratch or damage paint.
- Distilled Water:
- Tap water often contains impurities that could leave residues; distilled water ensures purity.
- Gentle Cleaning Solutions (Optional):
- Mild, specialised art cleaning solutions, available from art supply or conservation stores.
- Olive oil is sometimes suggested as a DIY method, but it’s controversial. While it can temporarily restore lustre, it can also attract dust and degrade the paint surface over time, so use it with extreme caution or avoid it altogether.
Step-by-Step Method for Safely Cleaning an Oil Painting:
Step 1: Initial Assessment and Preparation
- Place the painting flat on a clean, stable surface, covered by a soft, protective cloth or towel.
- Ensure the workspace has good, even lighting—ideally natural daylight—to properly identify any dirt, grime, or damage.
- Inspect the painting thoroughly, noting areas of heavy dirt, dust, yellowing, cracks, or flaking paint.
Step 2: Gentle Surface Dusting
- Using a soft, dry brush or microfibre cloth, gently remove loose dust and surface debris.
- Brush slowly and lightly, following the direction of the brush strokes originally used by the artist.
- Pay close attention to areas with thick paint textures, as dust often settles here.
Step 3: Testing the Cleaning Method
- Before cleaning the entire surface, test your method on a small, inconspicuous area of the painting, preferably along the edge or on an area usually hidden by the frame.
- Lightly dampen a soft cloth with distilled water (never dripping wet) and gently wipe this small area.
- Observe carefully; stop immediately if you notice any colour lifting, smearing, or unusual reactions.
Step 4: Gentle Cleaning of the Painting Surface
- Once confident in your test area, proceed with cleaning the entire painting carefully.
- Lightly dampen the cloth (wringing it thoroughly so it’s barely moist), then slowly and gently wipe the painting surface.
- Work in small sections, using very light pressure, and regularly checking the cloth for signs of paint removal.
- Avoid circular or vigorous scrubbing; use delicate, linear motions along the painting’s original brush strokes.
Step 5: Drying the Painting
- After cleaning, place the painting in a safe, dust-free location, allowing it to air-dry completely.
- Do not use artificial heat (like hairdryers or heaters), as rapid drying can warp or damage the painting.
- Wait at least 24 hours before rehanging or reframing the artwork, ensuring it’s entirely dry to avoid potential mould or moisture damage.
Important Cautions:
- Avoid Harsh Chemicals:
Never use household detergents, alcohol, bleach, or harsh solvents, as these can permanently damage the paint and varnish layers. - Use Minimal Moisture:
Excess water can penetrate cracks, causing the canvas to swell or leading to paint flaking. - Stop if Unsure:
If the painting is very valuable, delicate, or visibly damaged, or if you’re uncertain about the results of your test cleaning, seek professional assistance immediately. - Controversial Cleaning Methods:
While some people advocate using olive oil, this can lead to long-term degradation, attracting more dirt or causing irreversible staining. It’s safest to avoid using it entirely.
Additional Expert Advice:
For in-depth advice on conserving and caring for your paintings, consider consulting experts from recognised institutions such as the Victoria & Albert Museum or ICON (The Institute of Conservation).
- Victoria & Albert Museum’s Guide to Caring for Paintings
- The British Association of Paintings Conservator-Restorers
- Institute of Conservation (ICON) Resources
Common Mistakes and Misconceptions
When attempting to clean an oil painting yourself, misconceptions and misguided advice can lead to irreversible damage. Many DIY methods recommended online or by non-professionals are not only ineffective but potentially harmful to your artwork. Understanding these pitfalls is crucial to preserve the beauty and value of your painting. Here, we explore common errors in-depth, explaining clearly why certain products or techniques should be avoided.
1. Using Olive Oil or Household Products
One of the most frequently suggested home remedies for cleaning oil paintings is olive oil. While the initial results might seem promising, the long-term effects can be devastating:
- Attracting Dust and Dirt:
Olive oil doesn’t dry fully and leaves an oily residue that attracts more dirt, dust, and grime over time, causing the painting to become dirtier more quickly. - Difficult to Remove:
Over time, olive oil can form a sticky, stubborn film on the painting’s surface, making it challenging for professional conservators to remove without causing damage. - Staining and Discolouration:
Oil can seep through cracks or fissures, permanently staining the painting and creating uneven discoloration that detracts from its aesthetic and monetary value.
Common household products to avoid include:
- Soap and Detergents: These are too harsh and contain chemicals that break down the protective varnish and pigments.
- Alcohol or Solvents: These can rapidly dissolve paint layers, causing irreversible damage.
- Furniture Polish: Such products often contain waxes or silicones that create a glossy but harmful residue.
2. Why Professional Products Are Essential:
Professional conservators use specialised cleaning solutions tested specifically for artwork preservation. These products are formulated to safely clean without damaging underlying layers, pigments, or varnishes. Always consult a specialist or conservation expert before applying any product, especially if your artwork is valuable or antique.
3. Risks of Aggressive Cleaning Techniques
Another common error is applying excessive force or aggressive techniques, leading to significant harm to the painting:
- Over-Scrubbing or Excessive Pressure:
- Applying too much pressure can scratch or remove delicate layers of dry paint, causing permanent physical damage.
- Using Rough Brushes or Abrasive Cloths:
- Hard brushes or abrasive cloths damage the painting surface, leaving permanent scratches or marks.
- Always use a soft cloth or brush and gentle, controlled movements when cleaning.
- Excessive Moisture:
- Using too much water or cleaning fluid can cause paint to swell, warp, or flake off the canvas.
- Damp conditions can also foster mould growth, further deteriorating the artwork.
4. Ignoring Expert Advice and Professional Restoration
One of the biggest mistakes you can make when cleaning an oil painting is underestimating the expertise needed to do it safely. Ignoring professional advice can have serious consequences:
- Failing to Recognise When Professional Restoration is Required:
Not all paintings are suitable for home cleaning. Valuable or historically significant pieces should always be assessed by a professional restorer. - DIY Solutions for Valuable Paintings:
Valuable, rare, or antique artworks demand specialised conservation techniques. Attempting DIY methods can significantly reduce their artistic and monetary value. - Lack of Professional Evaluation:
Without proper training, you may misjudge the severity of underlying issues such as hidden structural damage, fading varnish, or subtle pigment degradation.
5. Key Misconceptions Recap (Quick Bullet Points):
- Olive oil leaves harmful residues that attract dirt and damage paint.
- Household detergents, alcohol, and solvents are far too harsh and destructive.
- Excessive scrubbing permanently damages delicate paint layers.
- Too much moisture can encourage mould and structural damage.
- Valuable artworks require professional conservation assessment and care.
6. What Should You Do Instead?
If your painting shows signs of damage, or you’re uncertain about its condition, always seek advice from professional conservators. Qualified art restorers follow stringent ethical guidelines and use conservation-grade materials and techniques to restore paintings safely.
For authoritative, trusted advice on art conservation methods and professional cleaning, visit the Smithsonian Museum Conservation Institute. Their resources provide comprehensive, reliable guidance on caring for fine artworks, ensuring you avoid common pitfalls and misconceptions.

Professional Restoration: What You Need to Know
While gentle cleaning at home can restore the appearance of your oil painting, professional art restoration becomes essential when your artwork shows specific signs of damage or deterioration. Understanding when and why to contact a professional conservator can help protect your valuable pieces.
When to Contact a Professional Art Restorer
Clear indicators your painting requires professional attention:
- Flaking or peeling paint – indicates serious damage needing stabilisation.
- Yellowed or cloudy varnish obscuring the original colours.
- Tears, punctures, or warping in the canvas or supporting structure.
- Water damage or mould growth resulting from improper storage or exposure to moisture.
- Significant discolouration or staining from improper DIY cleaning attempts.
If you notice any of these issues, seeking expert advice immediately can prevent further damage and help preserve the painting’s value.
What to Expect from Professional Cleaning and Restoration
Professional art restorers follow a structured approach, employing conservation-grade materials and specialist techniques tailored to your artwork’s specific needs. Common restoration processes include:
- Initial Assessment and Examination:
Experts perform a careful, detailed analysis to assess the painting’s condition, identifying surface dirt, structural damage, or varnish deterioration using specialist lighting and magnification. - Varnish Removal and Replacement
Restorers carefully remove old, yellowed, or discoloured varnish using safe, solvent-based methods. A fresh, conservation-grade varnish is then applied to restore depth, colour, and protection. - Paint Consolidation and Repair
Flaking or lifting paint is stabilised using specialised adhesives to prevent further loss. - Retouching Lost Paint Areas
Skilled restorers fill missing areas of pigment carefully and reversibly, matching original colours precisely. - Structural Repairs
Torn canvases or damaged frames are repaired using specialist methods, preserving the integrity of the original materials.
A professional conservator will always document the process thoroughly, providing insights into the materials and methods used.
Costs and Benefits of Professional Restoration
Investing in professional art restoration involves some cost, but this expense is justified by multiple significant benefits:
- Enhanced Artwork Longevity:
Professional restoration significantly extends your painting’s lifespan, preserving its appearance for decades or even centuries. - Increased Financial Value:
Professionally restored artworks can appreciate significantly in market value due to their improved condition and authenticity. - Preserving Cultural and Historical Value:
Expert conservation safeguards cultural heritage, ensuring artwork can be enjoyed by future generations.
Typical Costs:
- Professional restoration prices can vary significantly depending on artwork size, age, condition, and the restoration required.
- Minor restoration (simple cleaning and re-varnishing) typically starts around £150–£300.
- Extensive conservation involving paint repairs, varnish removal, and retouching can range from £500 to over £1,000.
For detailed, professional advice and accurate quotations, consult reputable UK-based art restoration services, such as The Fine Art Restoration Company.
Protecting Your Oil Painting After Cleaning
After your oil painting has been cleaned and restored—either professionally or carefully at home—ongoing care is essential to preserve its appearance and condition.
Proper Handling and Display
Where and how you display your painting significantly impacts its lifespan. Follow these tips:
- Avoid Direct Sunlight:
UV rays from sunlight can fade pigments and damage varnish. Place your painting away from direct sunlight, using UV protective glazing if necessary. - Maintain Stable Environment:
Keep paintings away from extreme humidity, temperature fluctuations, and moisture. Stable room temperature (18-21°C) and humidity (45%-55%) are ideal. - Correct Hanging Techniques:
Ensure paintings are securely hung, ideally using picture wire, on interior walls to prevent accidental damage. - Avoid Extreme Temperatures and Humidity:
Never place paintings above radiators, fireplaces, or in bathrooms, kitchens, or conservatories.
Ongoing Maintenance and Regular Checks
Regular, gentle maintenance keeps your oil painting in optimal condition:
- Dust Regularly:
Gently dust your painting every 2–3 months with a soft cloth or brush to prevent grime build-up. - Routine Inspections:
Regularly inspect your artwork closely for signs of deterioration, such as yellowing varnish or minor cracks in paint. - Address Problems Early:
At the first sign of damage, consult an art restorer promptly to avoid costly repairs later.
UV Protection and Environmental Considerations
Protecting your painting from environmental damage is crucial. Ultraviolet (UV) rays, humidity, dust, and pollutants can severely damage artwork over time:
- UV-Protective Glass or Glazing:
For valuable pieces, framing your artwork behind UV-protective glass reduces the risk of fading and discolouration. - Climate Control:
Ideal environmental conditions for oil paintings are stable temperatures (around 20°C) and humidity levels between 45–55%. - Professional Framing:
Investing in high-quality framing using conservation-grade materials protects your painting long-term.
By carefully managing these environmental factors, you can extend the life of your artwork dramatically.
For additional authoritative advice on caring for your oil paintings, consult conservation resources provided by institutions like the Smithsonian Museum Conservation Institute.
Relevant Resources:
Conclusion
Caring for your oil paintings—whether valuable family heirlooms, treasured art pieces, or recently acquired artwork—requires careful consideration and informed decisions. Throughout this guide, we’ve explored in-depth how and when it’s safe to clean an oil painting yourself, along with scenarios that demand professional restoration.
Summary of Key Points:
- Safe DIY Cleaning:
Gently dusting and lightly cleaning your oil painting at home with soft cloths, brushes, and distilled water is suitable for minor dust and grime removal. Always test a small area first and avoid harsh household products or aggressive scrubbing. - When to Seek Professional Restoration:
Valuable, antique, or fragile paintings with visible damage such as flaking paint, yellowed varnish, or structural issues require professional intervention. Conservators use specialist techniques and materials to safely preserve and restore paintings without compromising integrity. - Protection and Maintenance:
After cleaning, correct handling, proper framing, regular inspection, and environmental considerations (such as avoiding direct sunlight and extremes of temperature or humidity) are essential for long-term preservation.
Encouragement to Seek Expert Advice:
While DIY cleaning methods are tempting, professional assessment and conservation are invaluable for preserving the integrity, beauty, and value of your paintings—especially for historically significant or emotionally treasured works. Art restoration experts not only clean and restore but also guide you in ongoing care to ensure your art remains vibrant and protected for future generations.
Share Your Experiences:
Have you ever attempted to clean an oil painting yourself? What challenges did you face? Share your experiences and questions below. Your insights can help others learn and care for their cherished artworks safely.
For further advice and engaging discussions with fellow art lovers and professionals, consider joining the community at the Art Conservation Forum.
Leave a Reply